Features
- CSA Certified Explosion-Proof Meter
- 0-20 mA, 4-20 mA, 0-5 V, 1-5 V, and ±10 V Field Selectable Inputs with ±0.03% Accuracy
- Feet & Inches Display Ideal for Level Applications
- Dual-Line 6-Digit Display, 0.6" (15 mm) & 0.46" (12 mm)
- CapTouch Through-Glass Button Programming
- Display Mountable at 0°, 90°, 180°, & 270°
- Isolated 24 VDC @ 25 mA Transmitter Power Supply
- Easy Field Scaling in Engineering Units without Applying an Input
- 4 Relays with Interlocking Capability + Isolated 4-20 mA Output Option
- Free PC-Based, On-Board, MeterView Pro USB Programming Software
- SunBright Display Standard Feature; Great for Outdoor Applications
- Operating Temperature Range: -40 to 60°C (-40 to 140°F)
- CSA Certified as Explosion-Proof / Dust-Ignition-Proof / Flame-Proof
- Input Power Options: 85-265 VAC / 90-265 VDC or 12-24 VDC / 12-24 VAC
- Display Input in Two Different Scales Simultaneously - Great for Level Applications
- Multi-Pump Alternation Control
- Round Horizontal Tank Function; Just Enter Diameter & Length
- 8-Point Linearization for Non-Linear Volume Measurements
- Password Protection
- Programmable Display, Function Keys & Digital Inputs
- Flanges for Wall or Pipe Mounting
- Explosion-Proof, IP68, NEMA 4X Die-Cast Aluminum Enclosure
- On-Board RS-485 Serial Communications
- Modbus® RTU Communication Protocol Standard
- Four 3/4" NPT Threaded Conduit Openings (Two Plugs Installed)
- Pipe Mounting Kits
- Stainless Steel Tag Available
- 3-Year Warranty
Overview
Front

Connections
The Only Explosion-Proof Feet & Inches Process Meter You Will Ever Need
Front, back and in between, the PD8-6001 ProtEX-MAX explosion-proof process meter boasts specifications, features and functionality that make it the only hazardous area process meter you will ever need. The front panel push-buttons can even be operated in a hazardous area without removing the cover by using the CapTouch through-glass feature.
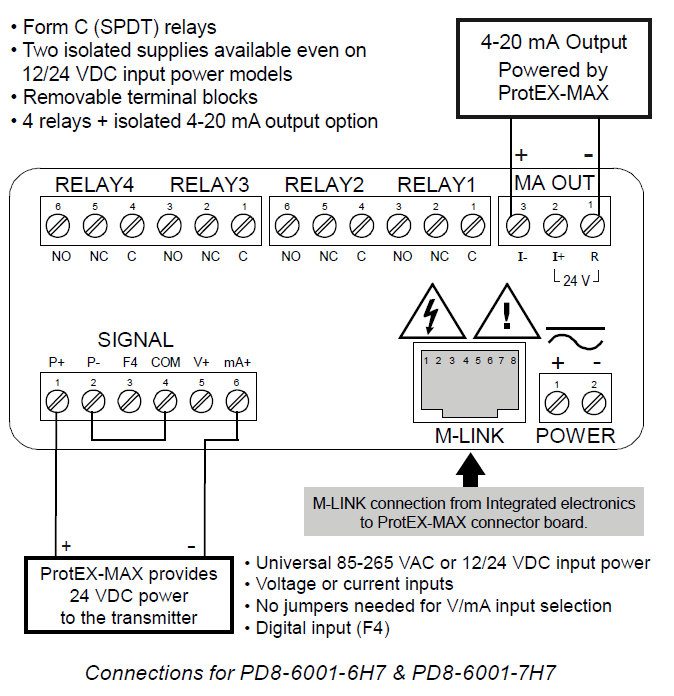
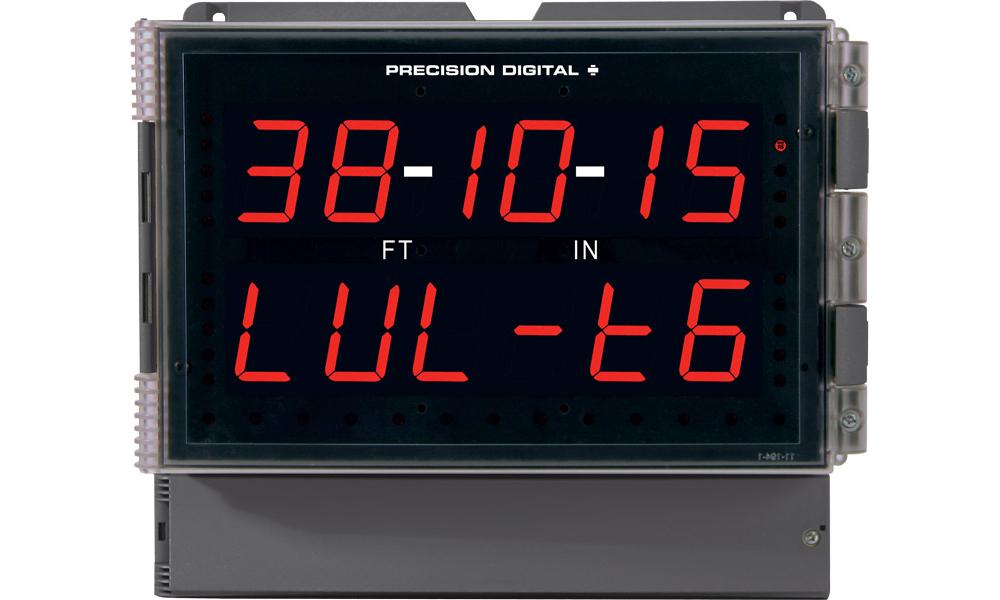
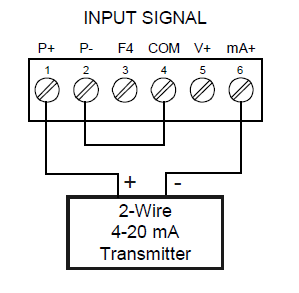
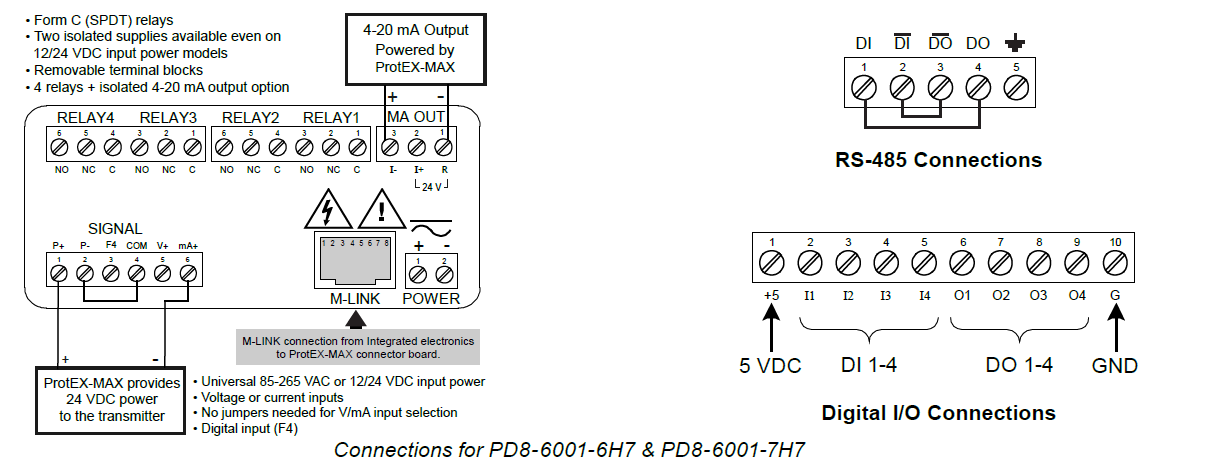
The primary function of this meter is to display level from a 4-20 mA output transmitter in feet and inches format rather than the more common decimal format. The PD8-6001 has all the same features as our PD6001 1/8 DIN process meter and is certified by CSA as Explosion-Proof / Dust-Ignition-Proof / Flame-Proof. Besides being suitable for hazardous areas, the number one feature that makes the PD8-6001 such a useful device is its built-in 24 VDC power supply to drive the transmitter as illustrated by the above diagram. This feature not only saves the cost of an external power supply, but also greatly simplifies wiring. In addition, there is a second 25 mA power supply provided with the 4-20 mA output option.
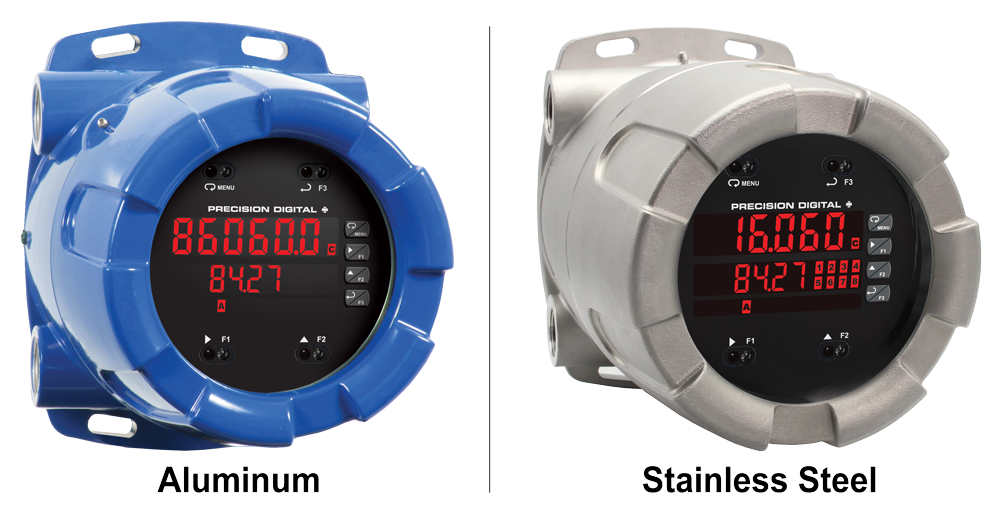
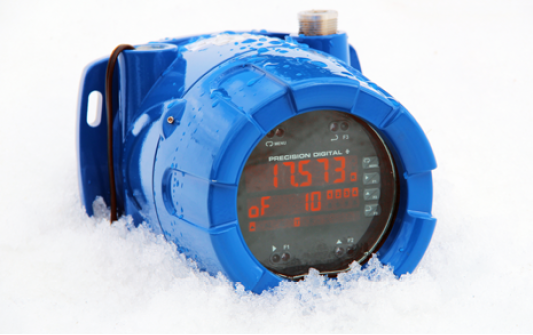
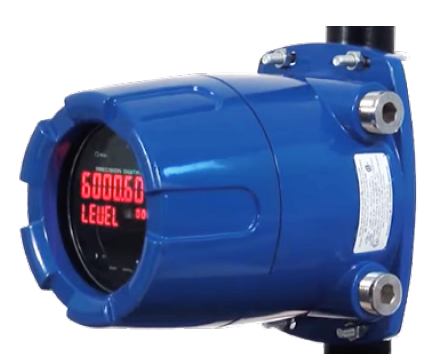
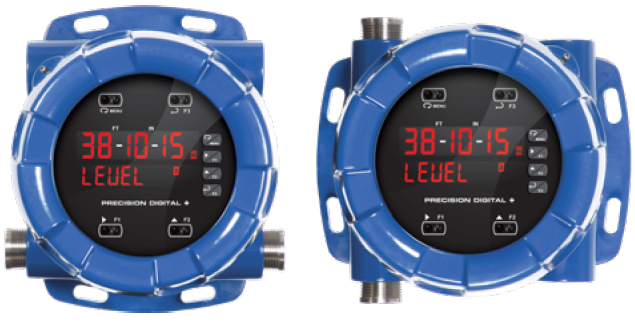
The first thing you notice about the PD8-6001 is its modern looking, rugged, die-cast aluminum housing with convenient mounting flanges. Housed inside this enclosure is a dual-line, 6-digit display with high-intensity LEDs that can be read in direct sunlight. It is ideal for level applications requiring an easy-to-understand display, as it shows feet, inches, and fractions of an inch. Other key features include four relays and 4-20 mA output option, advanced signal input conditioning like automatic round horizontal tank linearization, function keys, pump alternation capability, and Modbus RTU serial communications. Finally, all these features and capabilities can easily be programmed without removing the cover using CapTouch through-glass buttons in a hazardous area or with free MeterView Pro PC-based software in a safe area.
Transmitter Power Supplies
Meter Powers Transmitter
One of the most useful standard features of the PD8-6001 is its built-in isolated, 24 V @ 25 mA power supply to power the transmitter. This feature saves money by eliminating an external power supply and also simplifies wiring by reducing the number of devices in the loop. It can be configured for 5, 10, or 24 V (default) by means of a simple internal jumper. This power supply is even available on meters that are powered from DC power (24 V @ 25 mA). To use an external power supply instead of the internal power supply, simply make connections to different terminals on the ProtEX-MAX. The following diagrams illustrate how to wire the ProtEX-MAX so it will power the transmitter:
Meter Powers 4-20 mA Output
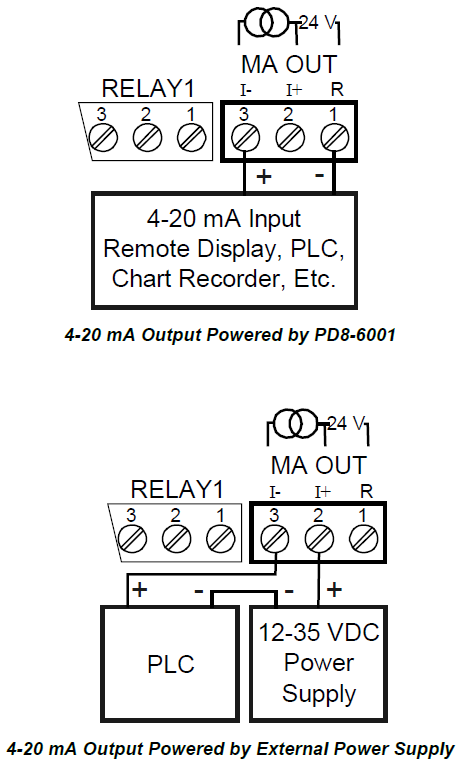
Not only can the ProtEX-MAX power the 4-20 mA input signal, but an additional power supply of 24 V @ 25 mA is provided with the 4-20 mA output option to power the 4-20 mA output.
Fuse Prevents Current Overload
Another very useful aspect of the ProtEX-MAX is that the current input is protected against current overload by a resettable fuse. The fuse limits the current to a safe level when it detects a fault condition, and automatically resets itself when the fault condition is removed.
Advanced Display Features
Display Level the Way You Want
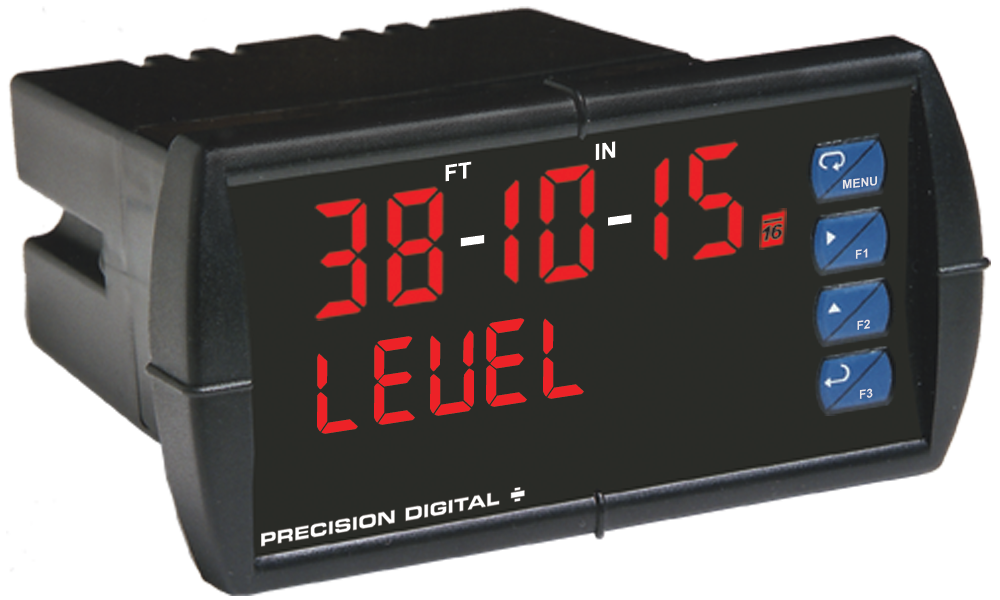
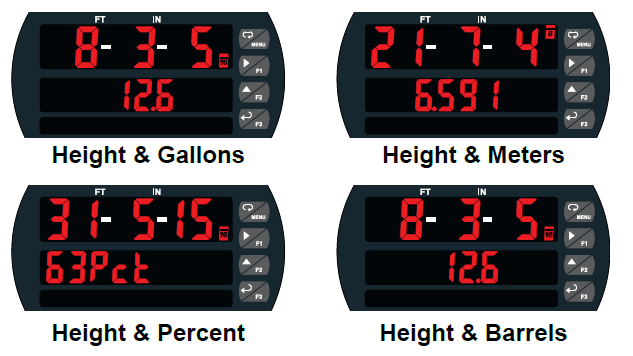
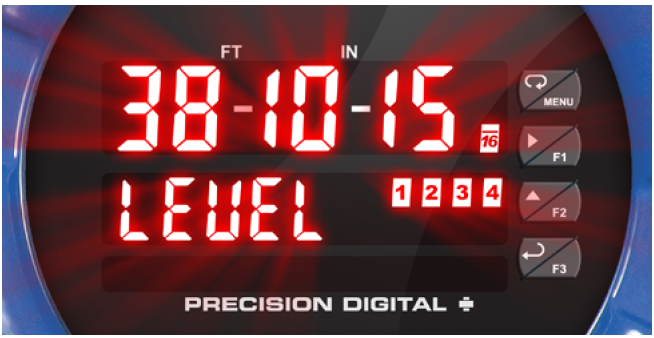
The PD8-6001 is the perfect meter for customers who prefer to see level measurements displayed in feet and inches (12FT11IN 7/16) vs the more standard decimal format (12.953 feet). And for customers that want to see the level in feet and inches and also the actual volume in the tank, the PD8-6001’s second display can be scaled to display the input in gallons, liters, barrels, etc.
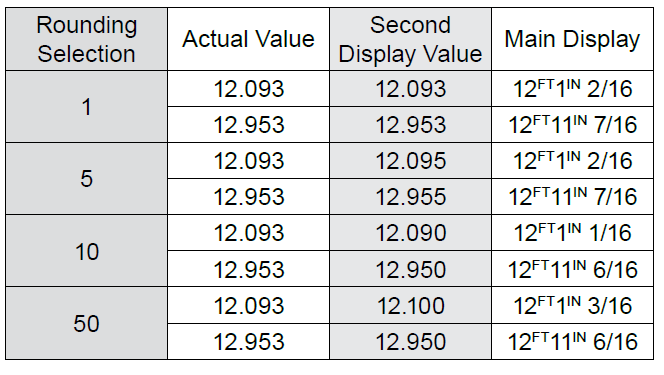
Rounding Feature for Even Steadier Display
The rounding feature is used to give the user a steadier feet and inches display with fluctuating signals. Rounding is used in addition to the filter function. Rounding is only applicable if the second display is setup to display level unit tags (d l-u). Rounding will round the second display to the nearest decimal value according to the rounding selected. The main display’s level reading will be adjusted to match the rounded decimal value. See examples below:
Dual-Line Makes All the Difference
The main display can be programmed to indicate PV, maximum (peak), minimum (valley), alternating maximum/ minimum, one of four alarm set points, or Modbus input. The second display can be configured to display engineering units, set points, user defined messages, or simply turned off.
The ProtEX-MAX's dual-line display makes all the difference both when programming the instrument and when using it in the field. When programming the instrument, the dual-line display prompts for the needed information and also helps you keep track of where you are in the setup process. When using the instrument, the dual-line display provides more information such as displaying the input in two different scales like height and volume for a level application. We call this the Dual-Scale feature.
Dual-Line Makes All the Difference
The ProtEX-MAX's dual-line display makes programming the instrument much easier because the second line prompts for the needed information and also helps you keep track of where you are in the setup process.
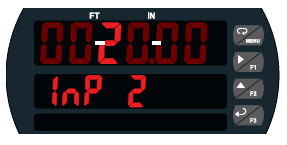
The ProtEX-MAX is prompting for the value for Input 2 and displaying the default value of 20.00 mA. The “2” in 20.00 is brighter than the rest of the digits indicating that it is the number that will be changed by the Up and Right arrows.
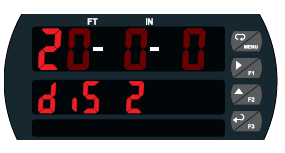
The ProtEX-MAX is now prompting for what the user wants Display 2 to be; that is the value that corresponds to 20 mA. In this case Display 2 is currently set to 20FT 0IN 0/16
Dual-Scale Display Feature
The ProtEX-MAX PD8-6001 has a rather unique, and very flexible dual-scale capability. This is of particular value in level applications where a second scaled display can represent the measured input in a different form (i.e. gallons & height). Both displays are independently scaled and are based on the 4-20 mA input signal.
MeterView Pro can be used to program the ProtEX-MAX to display the input in two different scales:
Super-Bright Display
The ProtEX-MAX comes standard with a super-bright display, with LEDs that are visible even in direct sunlight. The display also has up to eight levels of adjustable intensity for optimum visibility in any lighting condition.
Quick & Easy Scale & Programming Methods
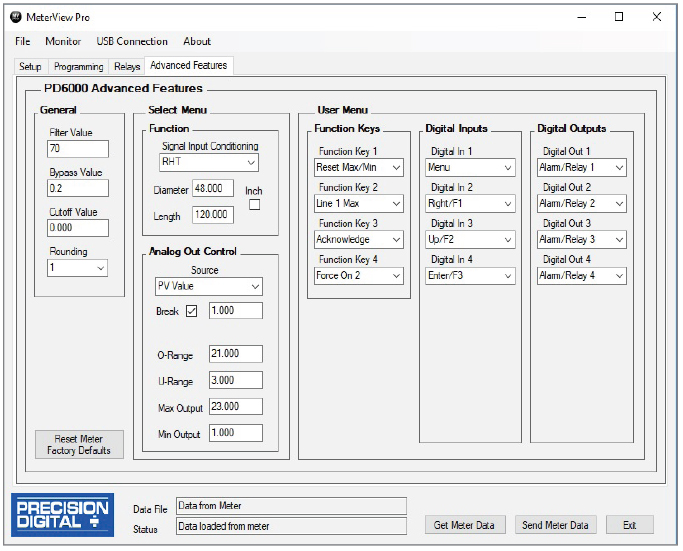
The ProtEX-MAX can be programmed either via the front panel push buttons or free, PC-based MeterView Pro software. MeterView Pro is resident on the ProtEX-MAX and is accessed by a provided USB cable, so it is by far the easiest way to program the ProtEX-MAX. The ProtEX-MAX can be calibrated either by applying a known signal or scaled by entering a desired value with the front panel buttons or MeterView Pro software. Most customers will use the scaling method because it is simpler and does not require a calibrated signal source. Selecting the input to be current or voltage is done with the front panel buttons or MeterView Pro software. Once programming is completed it can be locked with a password.
Free PC-Based MeterView Pro USB Programming Software & Cable
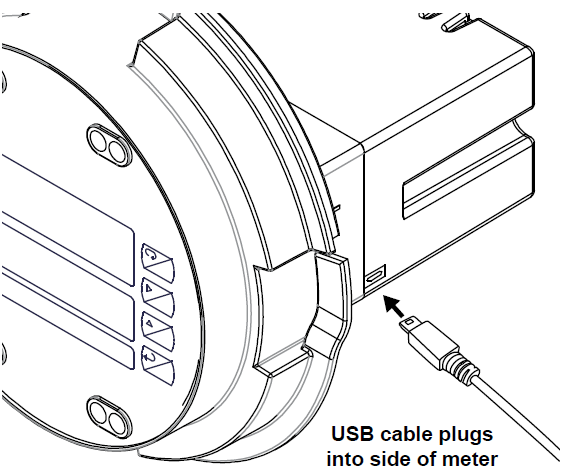
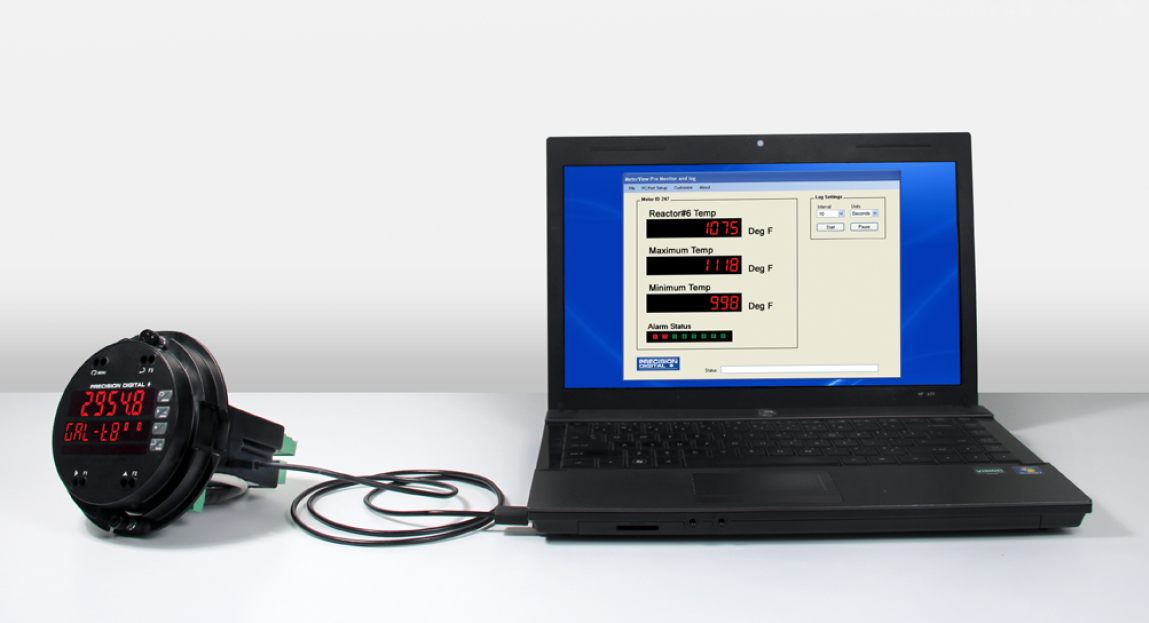
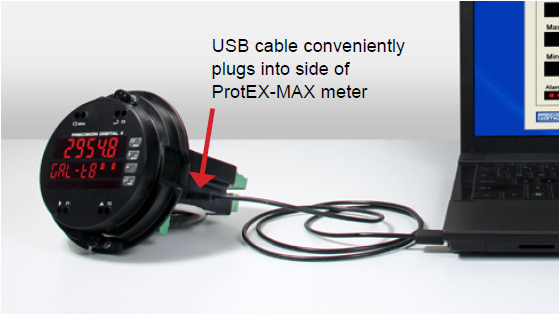
The ProtEX-MAX comes preloaded with free MeterView Pro programming software that connects and installs directly to your PC with a standard USB cable, also provided free with each instrument. This eliminates the need to insert CDs, install drivers, or download software from the internet. When you connect your ProtEX-MAX to your PC, MeterView Pro is downloaded to your PC, the software automatically selects the model you are programming, and you’re ready to start programming immediately. Further simplifying the programming process, the ProtEX-MAX can be powered from the USB port, so no need to apply external power while programming your meter. In addition to programming, the software will also allow you to monitor, and datalog a ProtEX-MAX using your PC. You can also generate and save programming files for later use.

CapTouch Through-Glass Buttons
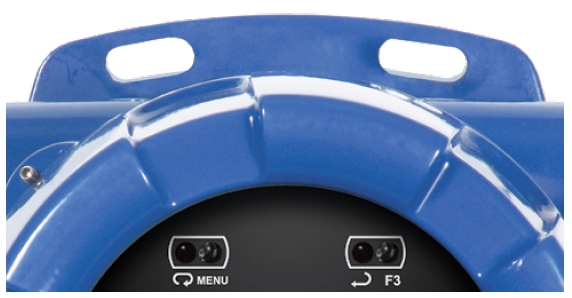
The ProtEX-MAX is equipped with four capacitive sensors that operate as through-glass buttons so that they can be operated without removing the cover (and exposing the electronics) in a hazardous area or harsh environment. CapTouch buttons are designed to protect against false triggering and can be disabled for security by selecting DISABLE on the switch labeled NO-CONTACT BUTTONS located on the connector board.
CapTouch Button Operation
To actuate a button, press one finger to the window directly over the marked button area. When the cover is removed or replaced, the CapTouch buttons can be used after the meter completes a self-calibrating routine. The sensors are disabled when more than one button is pressed, and they will automatically re-enable after a few seconds. When the cover is removed, the four mechanical buttons located on the right of the faceplate are used.
The CapTouch Buttons are configured by default to duplicate the function of the front panel mechanical pushbuttons associated with the integrated meter.
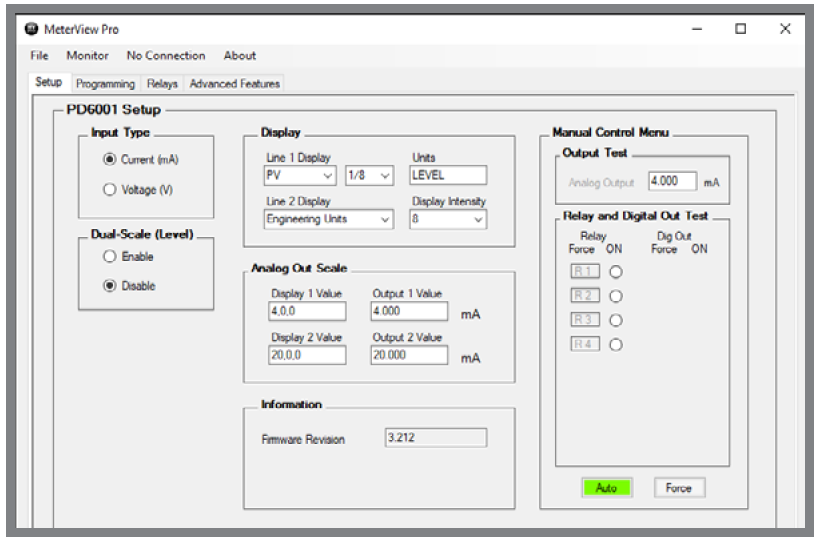
Setup Screen
- Select Voltage or Current Input
- Activate Dual-Scale (Level) Function
- Select Fractions of an Inch
- Set Line 1 Display Parameters
- Set Line 2 Display Parameters
- Set Analog Output Values
- Enable Manual Control
- Test Relays & Digital Outputs
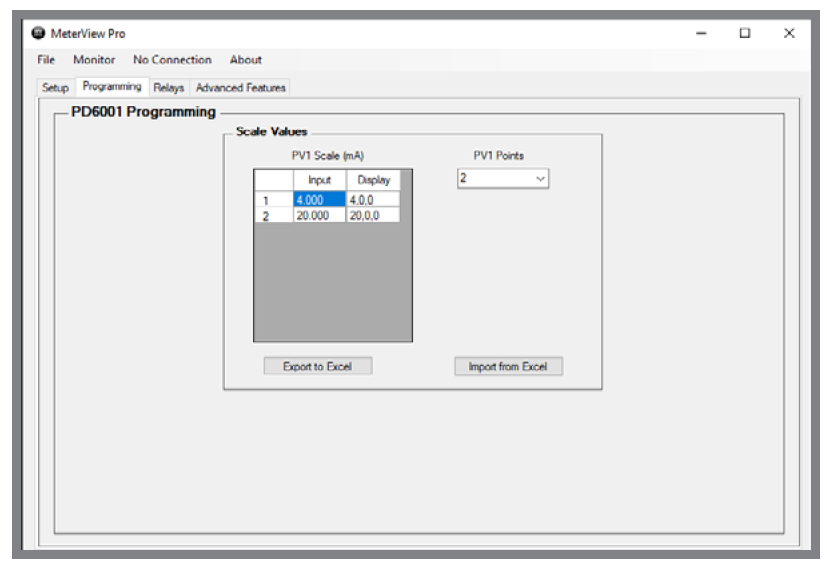
Programming Screen
- Set Scale Values
- Set the Number of Points (up to 32)
- Import from Excel
- Export to Excel
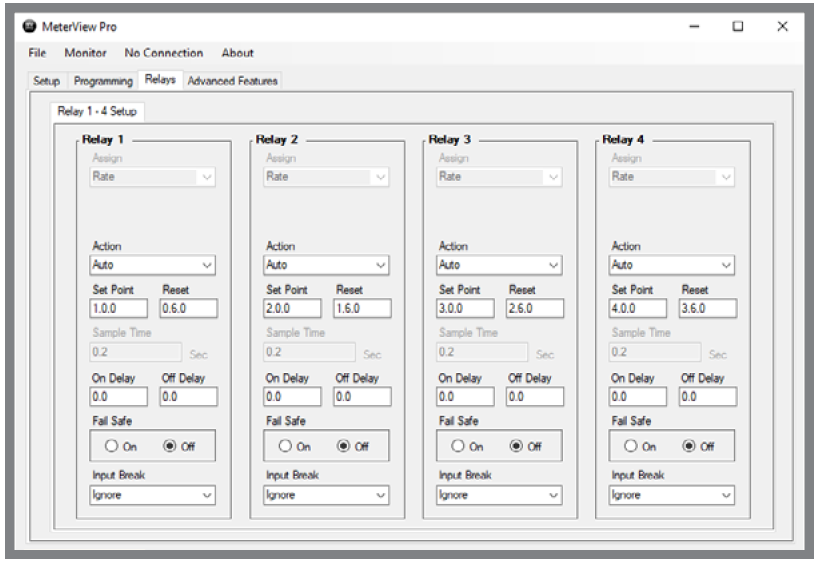
Relays Screen
- Greatly Simplifies Programming a Variety of Relay Features
- Set Relay Action
- Set Sampling Time
- Set Set & Reset Points
- Set On/Off Time Delays
- Set Fail Safe Operation
- Set Input Break Relay Action
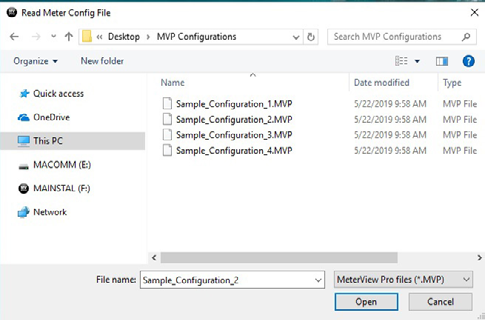
Save/Open Configuration
At the bottom of most MeterView screens are two tabs:
- Get Meter Data: This reads the programming of the meter that is currently connected to the PC.
- Send Meter Data: Clicking this button, sends current MeterView programming to the meter.

The configuration file can be sent or retrieved from the directory of your choice. This makes it very easy to program multiple meters with the same programming. It is also a great backup utility as well.
Specifications
System Requirements: Microsoft® Windows® XP/Vista/7/8/10
Communications: Onboard USB (firmware version 4.0 or higher), RS-232 Adapter or RS-485 Adapter
Meter Address: 1-247
Reports:
- Data Logging: Save as CSV file format
- Configuration: Save as PDC file format or print configuration
Baud Rate: 300-19,200 bps
Configuration: One meter at a time
Protocol: Modbus RTU (requires firmware version 4.0 or higher)
*Note: Windows 32/64-bit operating systems
Password Protection
The Password menu is used for programming three levels of security to prevent unauthorized changes to the programmed parameter settings:
Pass 1: Allows use of function keys and digital inputs
Pass 2: Allows use of function keys, digital inputs and editing set/reset points
Pass 3: Restricts all programming, function keys, and digital inputs
4-20 mA Output & Relays
4-20 mA Analog Output
The isolated analog retransmission signal can be configured to represent the process variable (PV), maximum (peak) value, minimum (valley) value, the value for any of the four relay set points, or Modbus input. While the output is nominally 4-20 mA, the signal will accurately accommodate under- and over-ranges from 1 to 23 mA.
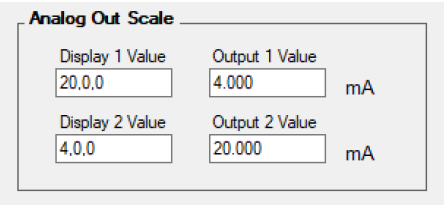
The 4-20 mA output can be reversed scaled such that 4 mA represents the high value and 20 mA represents the low value. For instance, a 4-20 mA output signal could be generated as the meter went from 50FT0IN0 to 0FT0IN0.
For applications where the input was linearized by the ProtEX-MAX, the 4-20 mA output will represent that linearized value.
Connections
The ProtEX-MAX can provide 25 mA at 24 VDC to power the 4-20 mA output signal or an external power supply can be used:
The 4-20 mA output can either be programmed using the front panel push buttons or free MeterView Pro software.
Front Panel Push Button Programming
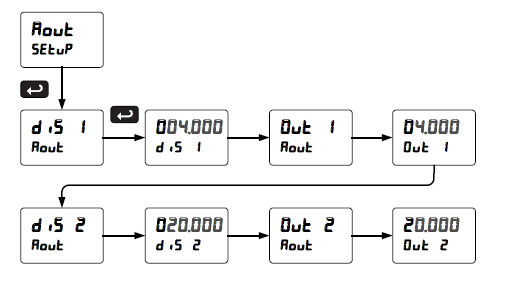
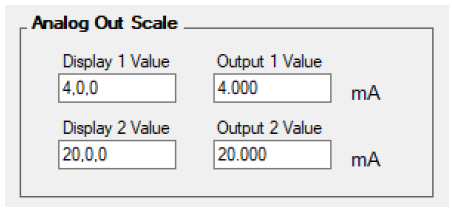
The 4-20 mA analog output can be scaled to provide a 4-20 mA signal for any display range selected. No equipment is needed to scale the analog output; simply program the display values to the corresponding mA output signal. The Analog Output menu is used to program the 4-20 mA output based on display values.
MeterView Pro Software Programming
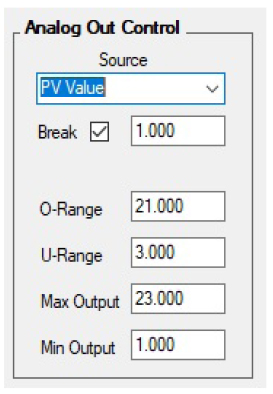
When a meter is programmed as shown below, the output will be 4.00 mA when the display reads 4FT0IN0 and the output will be 20.00 mA when the display reads 20FT0IN0.
The meter can be set up for reverse scaling as shown below: the output will be 4.00 mA when the display reads 20FT0IN0 and the output will be 20.00 mA when the display reads 4FT0IN0.
Source: Source for generating the 4-20 mA output (e.g. PV)
Overrange: Analog output value with display in overrange condition
Underrange: Analog output value with display in underrange condition
Break: Analog output value when loop break is detected
Max: Maximum analog output value allowed regardless of input
Min: Minimum analog output value allowed regardless of input
Relays for Hazardous Area Alarm & Control Applications
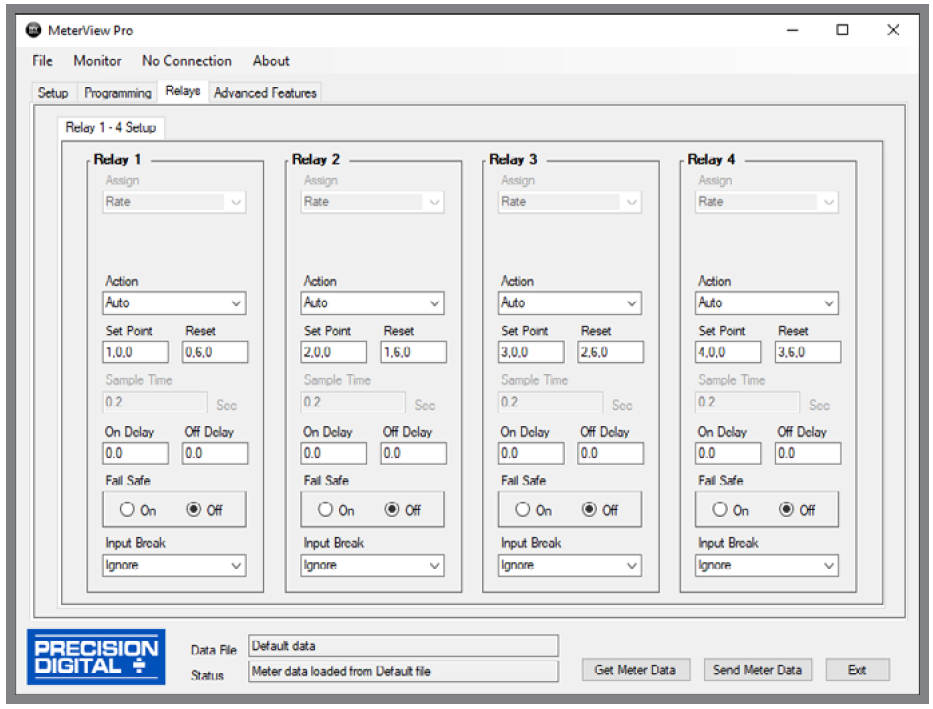
Adding relays to the ProtEX-MAX meter turns it into a sophisticated explosion-proof alarm device as well as a powerful, yet simple, alternative to a more complicated PLC system for control applications. One such application would be pump control using the ProtEX-MAX's relays in pump alternation mode. The ProtEX-MAX can be equipped with up to four 3 A Form C (SPDT) relays that can all be programmed to alternate, thus creating an explosion-proof pump alternator. Relays are highly user-configurable as the following screen shot from MeterView Pro indicates:
*Values are intended to show programming choices. They are not intended to represent an actual application.
Setting Set and Reset Points (HI / LO Alarms)
All relays are independent of each other and may be programmed as high or low alarms with user desired set and reset points. Setting a set point above a reset point results in a high alarm and setting a set point below a reset point results in a low alarm. Alarms have 0 – 100% deadband and set and reset points may be set anywhere in the range of the meter.
Resetting the Relays (Action in MV Pro)
All relays are independent of each other and may be programmed to reset (Action in MV Pro) in the following ways:
- Automatic: Alarm will reset automatically once the alarm condition has cleared.
- Automatic/Manual: Alarm will reset automatically once the alarm condition has cleared but can also be reset using the F3 front panel button* at any time.
- Latching: Alarm must be reset manually and can be done so at any time. Press the F3 front panel button* at any time to clear the alarm.
- Latching with Reset after Cleared: Alarm must be reset manually and can only be done so after the alarm condition has cleared. Press the F3 front panel button* after the alarm condition has cleared to reset the alarm.
*Or by connecting an external switch to F4 terminal or with an optional digital input.
Time Delay (On and Off)
In many applications it is desirable to wait before turning off or on a relay – such as waiting for a process to settle before taking action. Each relay on the ProtEX-MAX can be programmed with independent on and off time delays of 0 to 999.9 seconds to achieve this.
Relays Auto Initialization
When power is applied to the meter, the front panel LEDs and alarm relays will reflect the state of the input to the meter.
Signal Loss or Loop Break Relay Operation
When the meter detects a break in the 4-20 mA loop, the relay will go to one of the following selected actions:
- Turn On (Go to alarm condition)
- Turn Off (Go to non-alarm condition)
- Ignore (Processed as a low signal condition)
User Selectable Fail-Safe Operation
All relays are independent of each other and may be programmed for user selectable fail-safe operation. With the fail-safe feature activated, the relays will transfer to the alarm state on power loss to the meter.
Front Panel LEDs
The meter is supplied with four alarm points that include front panel LEDs to indicate alarm conditions. This standard feature is particularly useful for alarm applications that require visual-only indication.
Manual Output Control
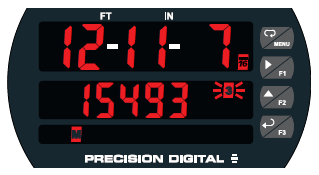
Take control of any output with this feature. All relays can be forced ON or OFF, and the 4-20 mA output signal can be set to any value within its range. When the relays and 4-20 mA output are controlled manually, an LED labeled “M” is turned on and the associated Alarm LEDs (1-4) flash every 10 seconds indicating that the meter is in manual control mode.
Interlock Relay(s)
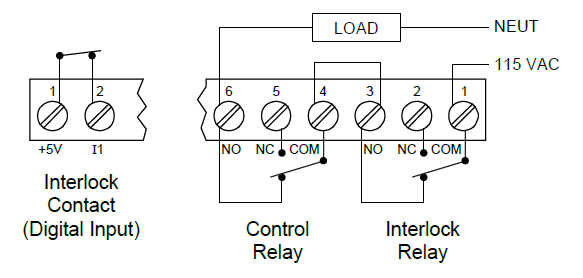
This function allows a process to use one or more very low voltage input signals or simple switch contacts to control the state of one or more internal “interlock” relays. A violation (i.e. loss of input, open switch, or open circuit) forces one or more N/O interlock relay contacts to open. One input can be used in series with a number of interlock switches, or up to eight inputs can be required to force-on one (or more) internal interlock relays. Please see Safety Interlock on the ProVu Series whitepaper on our website for more information.
Switching Inductive Loads
The use of suppressors (snubbers) is strongly recommended when switching inductive loads to prevent disrupting the microprocessor’s operation. The suppressors also prolong the life of the relay contacts. Precision Digital offers the PDX6901.
Explosion-Proof Multi-Pump Alternation
The ProtEX-MAX can be used as an explosion-proof pump controller when combined with a continuous level transmitter. The most common pump control application is shown below: controlling and alternating two pumps and providing high and low-level alarms. In addition, the ProtEX-MAX provides the 24 V to power the transmitter.
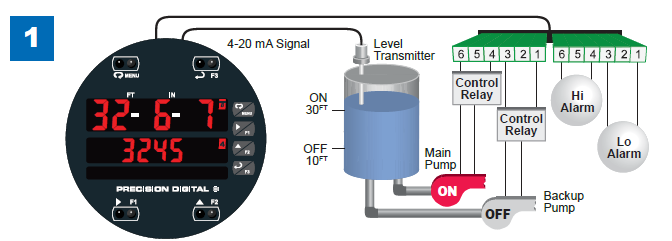
Relay #4 turns the main pump on at 30FT and turns it off at 10FT.
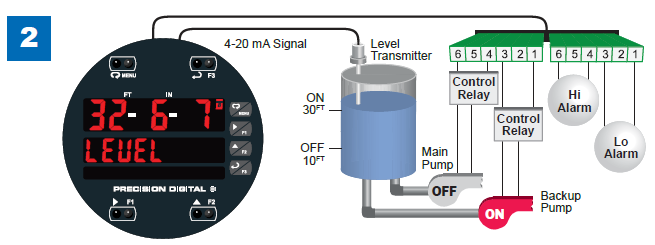
With the Pump Alternation feature activated, the next time the level reaches 30FT, relay #3 transfers and starts the backup pump.
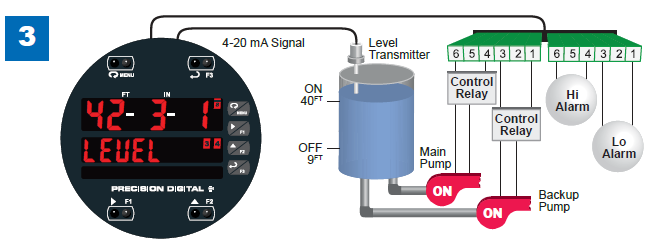
If the backup pump is not able to keep up, and the level reaches 40FT, relay #4 transfers and starts the main pump as well.
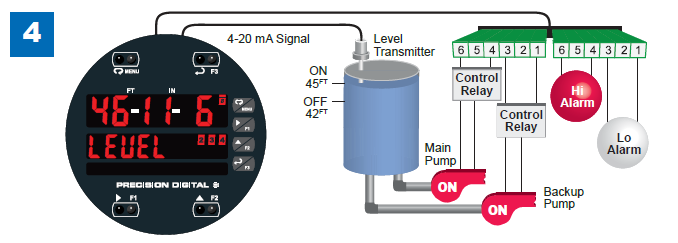
Relay #2 trips the High Level Alarm at 45FT and resets at 42FT.
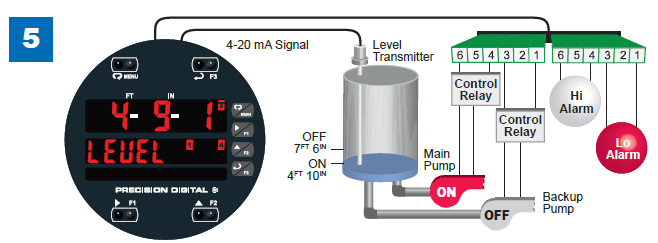
Relay #1 trips the Low Level Alarm at 4FT10IN and resets at 7FT6IN.
Signal Input Conditioning
There are many applications in the industrial world that can’t be satisfied with simple, two-point linear scaling so the ProtEX-MAX has advanced linearization capabilities to handle applications like round horizontal tank volume measurement. These features are most appropriate for the second display's decimal format.
Multi-Point Linearization
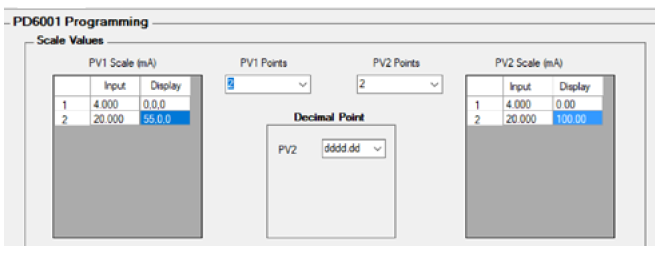
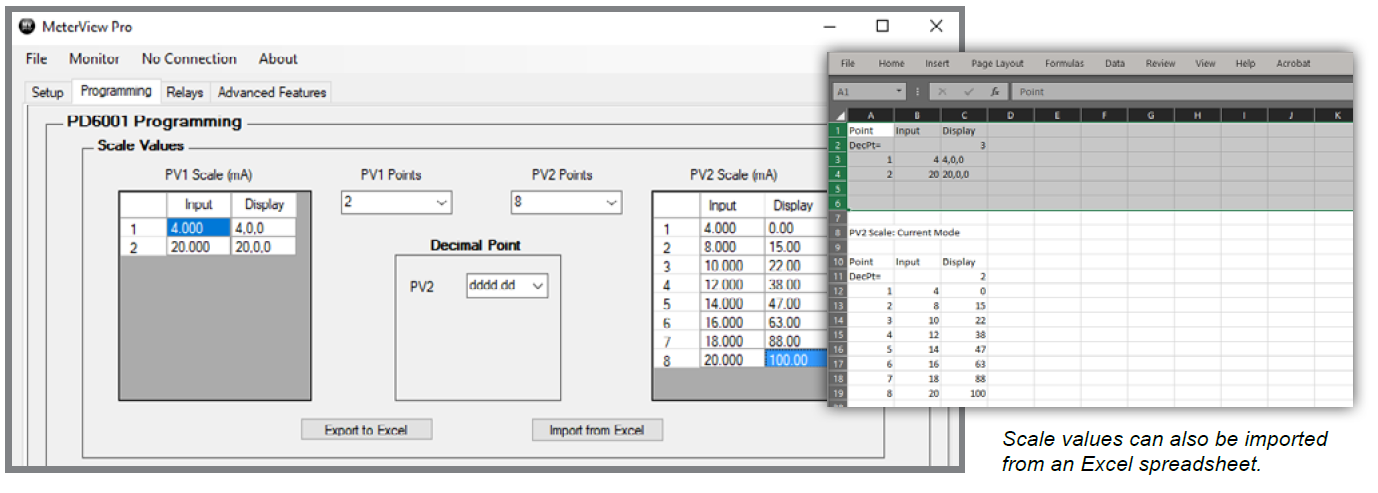
The most common way to linearize a non-linear signal is to break it up into smaller ranges that are more linear than the overall range. The ProtEX-MAX is available with up to 32 points of linearization and if dual scale feature is used, the second PV can have up to eight points of linearization. The linearization data can be imported from an Excel spreadsheet or can be exported from MeterView Pro to an Excel spreadsheet. The following screen shot from MeterView Pro shows PV1 with 2 points of linearization and PV 2 with 8 points of linearization:
Round Horizontal Tank Linearization
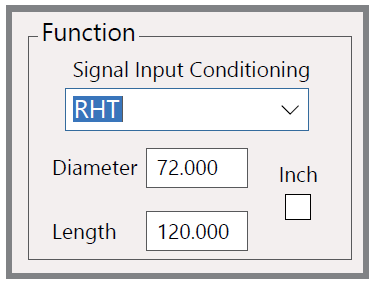
In addition to the generic 32- and 8-point linearization functions, the ProtEX-MAX is also available with specialized functions for round horizontal tanks. This function automatically calculates the volume in a round horizontal tank with flat ends and allows that reading to be displayed on the meter’s second display. The user can now display level in feet and inches on the main display and volume on the second display. This feature is only available on PV2 since PV1 is the designated level indicator.
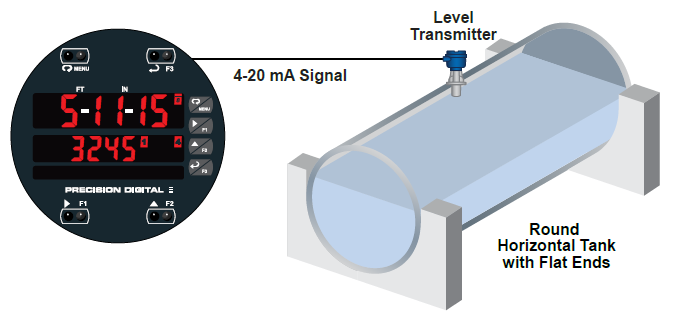
In this application, a level sensor is measuring the height in the round horizontal tank and the ProtEX-MAX is converting that signal to volume using the RHT function. All the user has to do is input the diameter and length of the tank and the meter converts the signal to volume.
Linear 4-20 mA Analog Output
For applications where the input was linearized by the ProtEX-MAX, the 4-20 mA output will represent that linearized value.
Digital Communications
Modbus® RTU Serial Communications
With onboard RS-485 serial communication, the PD8-6001 can communicate with any Modbus master device using the popular Modbus communications protocol that is included in every ProtEX-MAX. In addition to the typical Modbus capabilities of reading PVs and writing set points, below are some examples of other things that can be done with the meter’s Modbus communications:
- Send a 6-character message to the lower display upon an event
- Convert a digital value to a 4-20 mA signal
- Remote user control (i.e. change set points, acknowledge alarms)
- Input a Modbus digital PV (in place of analog input)
- Remote override of any or all relays and analog outputs

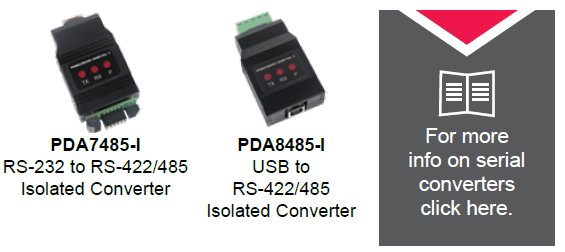
Serial Adapters & Converters*
*All adapters and connectors supplied with appropriate cables.
Integrated Digital I/O and Serial Communications
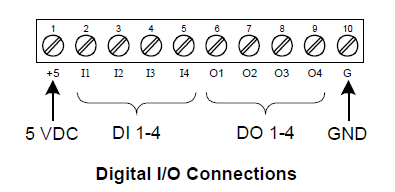
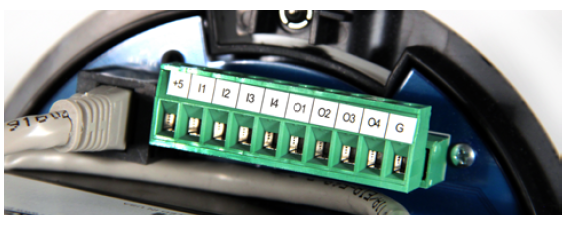
Digital I/O Connections
Four digital inputs and four digital outputs come standard with the ProtEX-MAX. External digital inputs can function similarly to the front panel function keys or digital input F4. They can be configured to trigger certain events (i.e. acknowledge/reset alarms, reset max and/or min values, disable/enable all output relays, and hold current relay states), or provide a direct menu access point. The inputs can be connected to a multi-button control station to provide the user with remote control of the four front panel push buttons.
Digital outputs can be used to remotely monitor the ProtEX-MAX’s alarm relay output states, or the states of a variety of actions and functions executed by the meter.
Note: The onboard digital inputs (1-4) are configured at the factory to function identically to the front panel pushbuttons (Menu, F1, F2, & F3) in order to work with the CapTouch buttons. Changing the programming of the digital inputs will affect the function of the CapTouch buttons
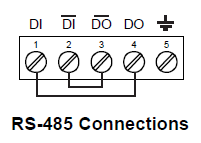
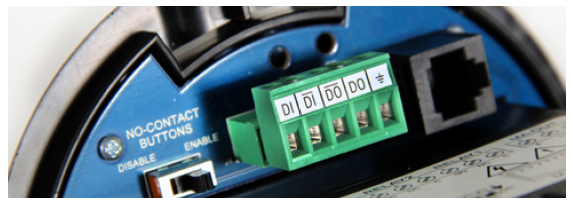
Serial Communications Connections
ProtEX-MAX meters come with an RS-485 connection for serial communications with other digital devices. The industry standard Modbus® RTU protocol is included with every meter.
Physical Features
The ProtEX-MAX is designed for ease-of-use in safe and hazardous applications. The ProtEX-MAX is housed in a rugged NEMA 4X explosion-proof enclosure, can operate over a wide temperature range, includes removable screw terminal connectors, has worldwide approvals for use in hazardous areas, and features through-glass buttons for easy meter operation without the need to remove the cover. All of these features are backed by a 3-year warranty.
Super-Bright LED Display
The ProtEX-MAX features a dual-line 6-digit display with super-bright LEDs, our brightest ever. These allow the display to be read in any lighting condition, even in direct sunlight.
CapTouch Through-Glass Buttons
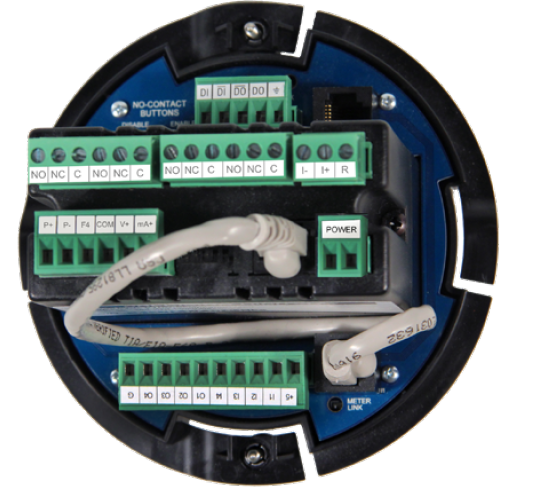
The ProtEX-MAX is equipped with four sensors that operate as through-glass buttons so that it can be programmed and operated without removing the cover (and exposing the electronics) in a hazardous area. These buttons can be disabled for security by selecting the DISABLE setting on the NO-CONTACT BUTTONS switch located on the back of the electronics module, inside the enclosure.
Rugged Heavy Duty Enclosure
The ProtEX-MAX is housed in a rugged NEMA 4X, 7, & 9, IP68 die-cast aluminum enclosure, designed to withstand harsh environments in safe and hazardous areas over a wide temperature range.
Wide Viewing Angle
Customers can’t always look at the display from straight on, so the window and display module have been optimized to provide a wide viewing angle of approximately +/- 40°; nearly twice that of the competition.
Built-In Mounting Flanges
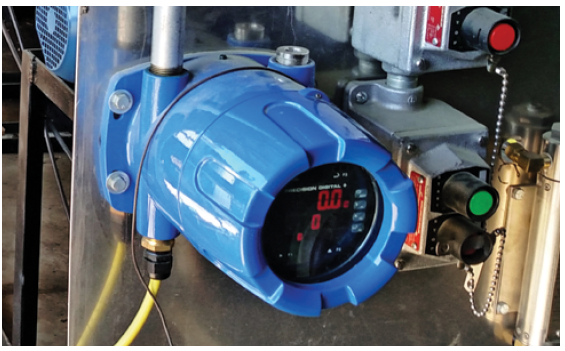
The ProtEX-MAX is equipped with four slotted flanges for wall mounting or NPS 1½" to 2½" or DN 40 to 65 mm pipe mounting.
Flexible Mounting & Wiring
The ProtEX-MAX features four ¾" NPT threaded conduit openings are available so that wiring can be routed to the most convenient conduit connection(s). Two ¾" NPT metal conduit plugs with 12 mm hex key fitting come installed.
Rotatable Display
The ProtEX-MAX rotatable display, along with four available conduit connections, provide for numerous installation options. The display can be rotated in 90° increments. Rotate it 90° for horizontal mounting.
Perfect & Secure Fit Every Time
The internal cast rails ensure the ProtEX-MAX assembles together perfectly, quickly and securely; and everything lines up for optimal viewing every time. There are no standoffs to worry about breaking or getting out of alignment. Two springloaded, self-retaining, thumbscrews make the assembly a snap, while pressing the display as close to the glass as possible to improve wide angle viewing.
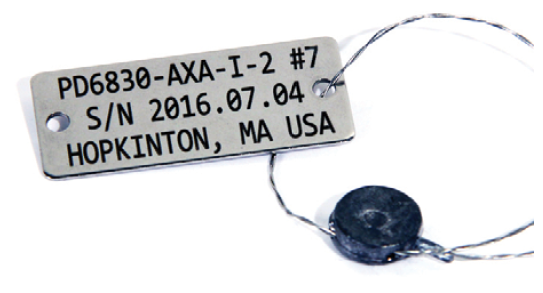
PDA-SSTAG Stainless Steel Tags
PDA-SSTAG is a laser etched stainless steel tag accessory for any of your Precision Digital meters. The tag features custom text for equipment identification, instruction, or whatever else is needed in your facility. Each tag comes with a stainless steel wire and lead seal for easy mounting wherever you need it.
Removable Screw Terminal Connectors
Industrial applications require screw terminal connections for easy field wiring and the ProtEX-MAX goes one step further in convenience by making them removable also.
USB Port for MeterView Pro
Hazardous Area Approvals
The ProtEX-MAX's approvals allow it to be used in hazardous areas around the world. These include: FM Approved as Explosion-Proof / Dust-Ignition Proof / Flame-Proof, CSA Certified as Explosion-Proof / Dust-Ignition Proof, and ATEX and IECEx Certified as Flame-Proof.
Wide Operating Temperature Range
The ProtEX-MAX can operate from -40 to 60°C (-40 to 140°F) meaning it can be installed in a wide variety of indoor and outdoor industrial applications. And over this range, the ProtEX-MAX will drift no more than 0.005% of calibrated span/°C max from 0 to 65°C ambient and 0.01% of calibrated span/°C max from -40 to 0°C ambient.
Videos To Watch
ProtEX-MAX Explosion-Proof Meters and Indicators
Learn About the ProtEX-MAX Series.

The ProtEX-MAX meter is very similar to the ProVu in features and functionality so the following videos might be of interest:
ProVu Series Overview
Learn About All the Meters in the ProVu Series!

ProVu Multi-Pump Alternation
Learn How to Use the ProVu as a Pump Controller.
ProVu Function Keys
Learn How the ProVu’s Function Keys Increase the Utility of the ProVu.
Connect a ProVu to a PC Using MeterView Pro
Learn How Easy it is to Use MeterView Pro Software.
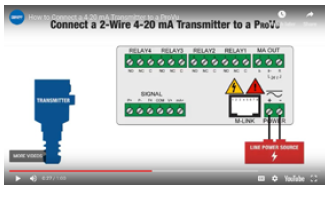
Connect a 2-Wire 4-20 mA Transmitter to a ProVu
Learn How to Connect Your Transmitter to a ProVu.
Operational Features
Function Keys, F4 Terminal, Digital Inputs
There are three ways the user can interact with the ProtEX-MAX to perform a variety of useful functions:
1. Three Front Panel Function Keys
The default settings for the function keys are:

2. Built-in Digital Inputs/Outputs
The ProtEX-MAX comes with five digital inputs and four digital outputs. The digital inputs can be used to change the status of the relays, operate with the tare, reset tare, or interlock relays feature, and much more. The digital inputs can also be connected to an appropriately approved control station to provide remote control of the programming / operation buttons. The digital outputs can be used to send signals to PLCs and other devices.
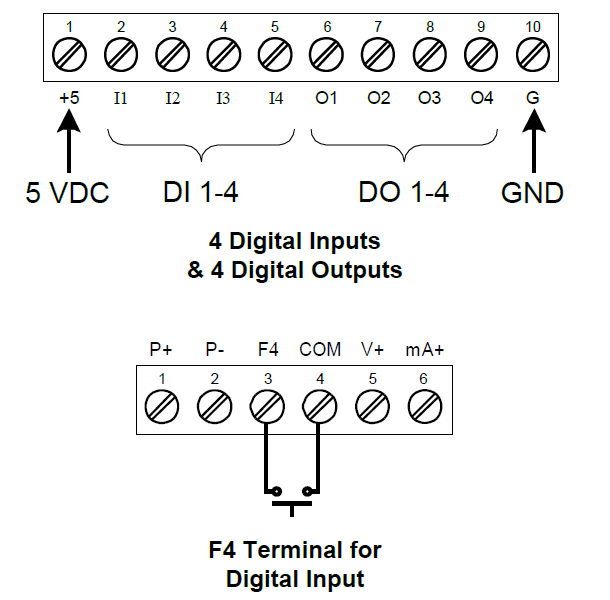
3. CapTouch Through-Glass Buttons
The ProtEX-MAX is equipped with four capacitive sensors that operate as through-glass buttons so that it can be programmed and operated without removing the cover (and exposing the electronics) in a hazardous area. The CapTouch buttons are configured by default to duplicate the function of the front panel mechanical pushbuttons associated with the integrated meter.
Function Key, Digital Inputs, & Digital Outputs Descriptions
The following table describes the actions that ProtEX-MAX function keys and digital inputs can be programmed to perform. The table also describes how the digital outputs can be programmed to remotely monitor the ProtEX-MAX’s alarm relay states, or the states of a variety of actions and functions executed by the meter.
| Display | Description | Item |
 | Reset the stored maximum display value | FK, DI, DO |
 | Reset the stored minimum display value | FK, DI, DO |
 | Reset the stored maximum & minimum display values | FK, DI, DO |
 | Capture tare and zero the display | FK, DI, DO |
 | Reset captured tare and resume normal operation | FK, DI, DO |
 | Directly access the relay menu | FK, DI |
 | Directly access the set point menu for relay 1 (*through 8) | FK, DI |
 | Disable all relays until a button assigned to enable relays (Rly E) is pressed | FK, DI |
 | Enable all relays to function as they have been programmed | FK, DI |
 | Hold current relay states and analog output as they are until a button assigned to enable relays (Rly E) is pressed | FK, DI |
 | Hold the current display value, relay states, and analog output momentarily while the function key or digital input is active. The process value will continue to be calculated in the background. | FK, DI |
 | Display maximum display value on line 1 | FK, DI |
 | Display minimum display value on line 1 | FK, DI |
 | Display maximum & minimum display values on line 1 | FK, DI |
 | Display maximum display value on line 2 | FK, DI |
 | Display minimum display value on line 2 | FK, DI |
 | Display maximum & minimum display values on line 2 | FK, DI |
 | Force relay 1 (*through 4) into the on state. This is used in conjunction with a digital input expansion module to achieve interlock functionality. | FK, DI |
 | Directly access the control menu | FK, DI |
 | Disable the selected function key or digital I/O | FK, DI |
 | Acknowledge all active relays that are in a manual operation mode such as auto-manual or latching | FK, DI, DO |
 | Directly access the reset menu | FK, DI |
 | Mimic the menu button functionality (digital inputs only) | DI |
 | Mimic the right arrow/F1 button functionality (digital inputs only) | DI |
 | Mimic the up arrow/F2 button functionality (digital inputs only) | DI |
 | Mimic the enter/F3 button functionality (digital inputs only) | DI |
 | Provide indication when alarm 1 (*through 8) has been triggered (digital outputs only) | DO |
FK: Function Keys DI: Digital Inputs DO: Digital Outputs

Remote Operation of Front Panel Buttons
The user can operate the front panel buttons from a remote location by using digital inputs programmed in the following manner:
Tare
The tare function zero’s out the display. In the case of scale weight, tare is used to eliminate container weight and provide net weight readings. There are two tare functions; Capture Tare and Reset Tare. When the capture tare function is used, the display reading is offset by the displayed amount to make the displayed value zero. This modified display value is the net value. The originally displayed value without the tare offset is the gross value. Both may be chosen as a display option. Reset tare removes the display offset.
Reset tare removes the display offset of the net value, and the gross and net values become the same until a new capture tare is entered.
Max / Min Display
Max/Min (or Peak/Valley) is standard on the ProtEX-MAX PD8-6001. Either display can be configured to show either maximum or minimum excursion since last reset. The displays can also be configured to toggle between Max and Min values. Both values can be simply reset from the front panel.
MeterView Pro Monitoring & Datalogging Software
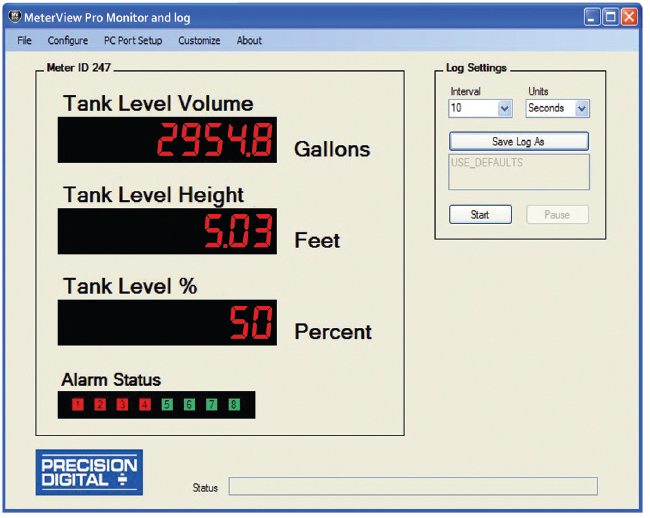
Not only does free MeterView Pro software greatly simplify setup and programming of the ProtEX-MAX, it can also be used to monitor and datalog your process.
- Custom Tags: i.e. Tank Level Volume
- Custom Units: i.e. Gallons, Feet, Percent
- Alarm Status Indicators
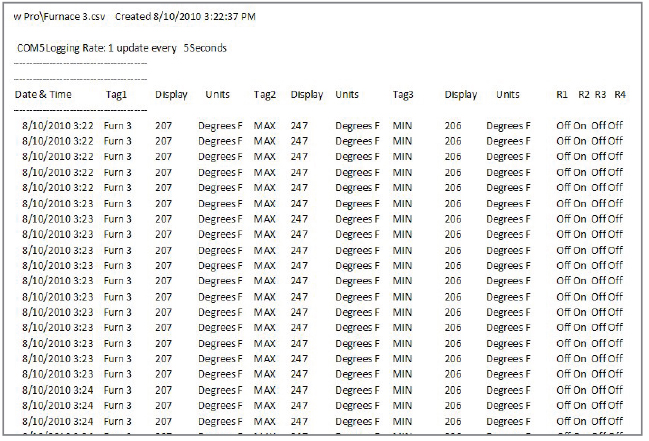
Datalog Report
Collected data logger information can be sent to a CSV file for importing into a spreadsheet program. Below is an example of one such file. Of course, once within the spreadsheet, much can be done to customize the data.
Relay Control
Relays can be controlled from MeterView Pro for testing purposes. This is commonly done to determine whether the relays are functioning properly. In the Setup window, under Relay and Digital Out Test you have the option of selecting the relays you want in an ON state or OFF state and also whether you want to leave the relays in manual control or to return them to automatic operation.
Connections
